Essential Guide to Vapor Barrier Installation for Optimal Home Protection
Understanding Vapor Barrier Installation
What is a Vapor Barrier?
A vapor barrier is a material designed to prevent moisture from penetrating through walls, floors, and ceilings of buildings. Typically made from polyethylene plastic sheets, foil, or more specialized materials, vapor barriers serve as a protective layer that effectively manages humidity levels within enclosed spaces. They are crucial for maintaining a dry and healthy environment, especially in areas prone to dampness and moisture accumulation, such as crawlspaces and basements. Prioritizing Vapor Barrier Installation can enhance a home’s structural integrity and indoor air quality.
The Importance of Vapor Barrier Installation
Proper vapor barrier installation is essential for several reasons:
- Prevention of Mold and Mildew: Moisture accumulation can foster the growth of mold and mildew, leading to health issues and structural damage.
- Enhanced Energy Efficiency: By controlling humidity, vapor barriers help stabilize indoor temperatures, thus reducing heating and cooling costs.
- Protection of Building Materials: Excess moisture can compromise the integrity of wood, insulation, and other materials, leading to costly repairs.
- Improved Indoor Air Quality: A well-maintained vapor barrier reduces allergens and pollutants, promoting a healthier living space.
Common Materials Used for Vapor Barriers
Different materials are used in vapor barrier installations, each offering unique benefits:
- Polyethylene Sheets: These are the most commonly used vapor barriers due to their effectiveness and cost-efficiency.
- Foil Laminates: Foil vapor barriers reflect heat and are commonly used in areas with extreme temperature fluctuations.
- Liquid Membranes: Applied as coatings, these materials create seamless barriers that can be customized for various spaces.
Preparing for Vapor Barrier Installation
Assessing Your Space
Before installing a vapor barrier, it’s crucial to assess the area where the barrier will be applied. Identify any existing moisture issues, such as leaks or damp spots, and address these problems prior to installation. Examine the foundation’s integrity, inspecting for cracks or gaps that could allow moisture infiltration. Furthermore, consider the climate in your region, as this can affect the vapor barrier’s effectiveness and selection.
Required Tools and Materials
Gathering the right tools and materials is vital for a successful vapor barrier installation. Essential tools include:
- Tape measure
- Utility knife or scissors
- Stapler or adhesive
- Seam tape (for overlapping edges)
- Safety gear, including gloves and goggles
Materials can include the vapor barrier recommended for your space, as well as any additional adhesive or sealing products that may enhance the installation.
Safety Considerations
Safety should always be your priority when installing a vapor barrier. Ensure proper ventilation in the workspace, particularly if using adhesives that emit fumes. Always wear protective gear to safeguard against sharp tools and materials, and practice safe lifting techniques if handling heavy rolls of barrier material.
Step-by-Step Guide to Vapor Barrier Installation
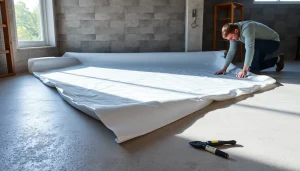
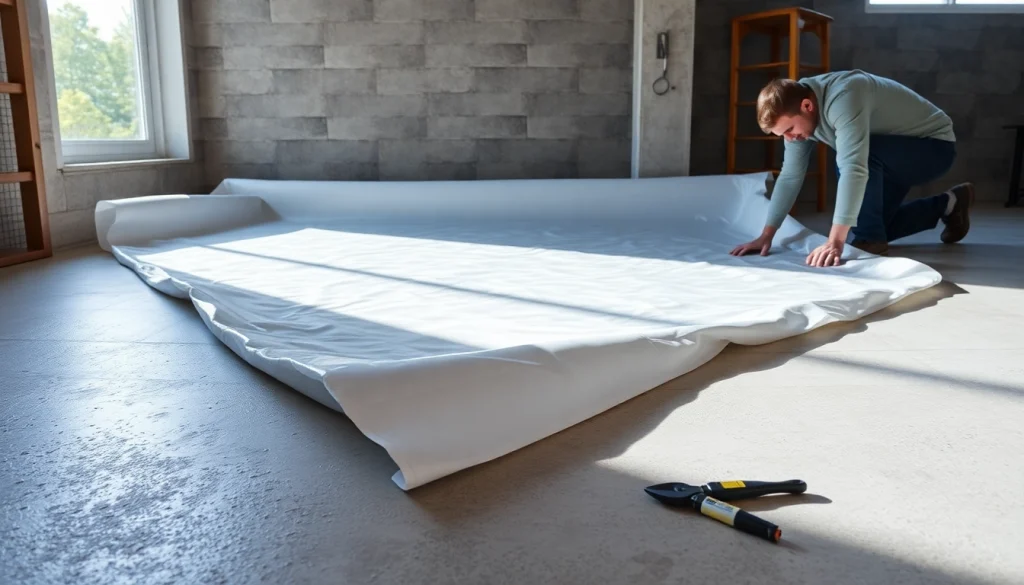
Measuring and Cutting the Barrier
Begin by measuring the dimensions of the area where the vapor barrier will be installed. Make sure to account for any obstructions or unique features of the space. Next, using the measurements, cut the vapor barrier material accordingly, allowing for extra material to extend up walls or around obstacles for comprehensive coverage.
Applying the Barrier
Spread the cut vapor barrier over the designated area, ensuring that it lays flat and smooth. For crawlspaces, start from a corner and work your way out to minimize wrinkles. Typically, overlaps of at least 12 inches should be ensured between sheets and adhered firmly using tape or adhesive to maintain an airtight seal.
Sealing and Finishing Touches
Once the barrier is laid, sealing the seams is crucial for the effectiveness of the installation. Use seam tape to create airtight seals at overlapping joints, and inspect all edges to ensure there are no gaps. Finally, trim any excess material and secure the edges to the walls or flooring adequately.
Common Challenges in Vapor Barrier Installation
Identifying Potential Moisture Issues
During installation, it’s imperative to identify and mitigate potential moisture issues. Check for any leaks, seepage, or signs of prior water damage. If moisture is detected, it may be necessary to install drainage systems or dehumidifiers before proceeding with the vapor barrier.
Dealing with Uneven Surfaces
When applying a vapor barrier to uneven surfaces, it may require additional effort to ensure that the material lays flat. Consider using a thicker material or adding a leveling compound prior to installation to create a smooth substrate for the barrier.
Ensuring Proper Adhesion
For the vapor barrier to function properly, it must adhere effectively to all surfaces. If the adhesive fails or the barrier does not hold, moisture can easily penetrate. Ensure that all surfaces are clean and free from debris, and consider using a stronger adhesive or additional sealing products in high-moisture areas for enhanced performance.
Maintenance and Monitoring Post-Installation
Regular Inspections
Once the vapor barrier is installed, regular inspections are necessary to ensure its continued effectiveness. Check for rips, tears, or signs of moisture penetration at least once a season or after significant rainfall. Regular maintenance can prevent minor issues from escalating into costly repairs.
Signs of Damage or Failure
Be alert to any signs of damage or failure in the vapor barrier. These include visible mold growth, musty odors, persistent dampness, or water stains on walls or floors. If any of these issues arise, immediate inspection and remediation are advised.
When to Seek Professional Help
If moisture problems persist despite installation efforts, or if the installation process becomes too complex, seek professional assistance. Expert installers can assess underlying issues and ensure that your vapor barrier is effective for long-term protection against moisture-related problems.
Frequently Asked Questions
1. How long does a vapor barrier last?
Vapor barriers can last for decades when installed correctly and maintained, with typical lifetimes ranging from 15 to 30 years.
2. Can I install a vapor barrier myself?
Yes, with the right tools, materials, and safety precautions, many homeowners can successfully install a vapor barrier on their own.
3. What are the best conditions for installation?
Installing a vapor barrier is best done in dry conditions to ensure good adhesion. Avoid installation during heavy rain or high humidity.
4. Do I need a vapor barrier in every building?
Not every building requires a vapor barrier, but it is essential in areas prone to moisture, like basements and crawlspaces.
5. What happens if I don’t install a vapor barrier?
Without a vapor barrier, moisture can lead to mold, mildew, and damage to structural materials, resulting in costly repairs and health hazards.